The Inside Zone – Article 4

The Inside Zone

In the last few articles, I’ve covered some of the basics of the Inside Zone for Offensive Line, players and coaches. It’s pretty technical and founded on a lot of hard work and studying, as well as a fair bit of trial and error.

In this article we’ll look at some of the basics of running the inside zone, from a co-ordinator’s standpoint, and some of the variations you can use to make a simple Inside Zone play, a big part of your offense.
Let’s first look at some small technicalities, regarding Running Back entry point, and what this does to the defense.

For the purposes of these diagrams, I will draw them all out of a spread, under centre look, and we will look at different formations later on.

Aiming Points and Entry Points

Whilst there is only a very subtle difference in terminology here, please clear, they are two very distinct things.
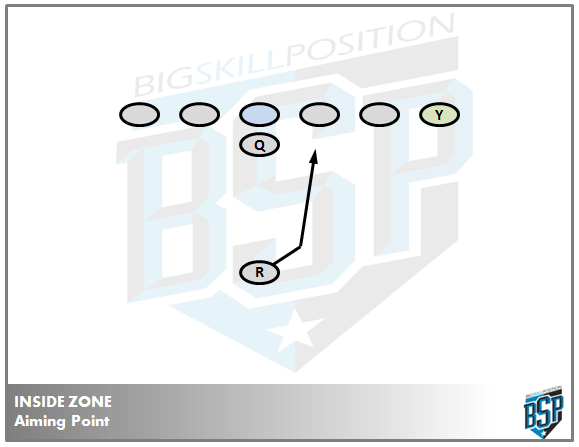
The Aiming Point, is the visual key you give the Running Back to aim for.
The Entry Point is the Gap you are expecting to be open based on the defensive front.

Aiming Point

The Aiming Point for Inside Zone can be anywhere from the Centre’s playside butt cheek, to the outside shoulder of the playside guard, it very much depends on your players, offensive style and what you are trying to accomplish.
For me, I like the Running Back (RB) to have an aiming point at the middle of the Playside Guards’ (PSG) butt.

Fig 4.1


This allows the RB the best post-snap read of the play developing in front of him, before he makes his cut. The idea is to aim for the centreline of the PSG, to give an entry point of the PS A Gap. However, we all know this depends on a few things, mainly the defensive front, so this leads us on nicely to the Entry Points.

Entry Point

The entry point is the hole/gap the running back attacks as he explodes through the line. The Aiming Point gives the RB a track to work on, the Entry Point is the entry point through the line of scrimmage, and these are different things.

The entry points will vary based on the defensive front, but if you give the RB unlimited options in where to go with the ball, chances are he’ll over think it, and you’re not going to get many gains from that play.
So we have reduced the running backs options to 3, and we use an easy to remember verbiage to instil these options into the RB’s mind.

BANG IT – Hit it in the Playside A Gap – This is the ideal scenario for us.

Fig 4.2

BEND IT – Bend it to the Backside A Gap – we band it if the playside A Gap has been crashed or filled

Fig 4.3

BOUNCE IT – Bounce it to the Playside B Gap or wider – We bounce when the middle is clogged up.

Fig 4.4

Please note, I have drawn the Running backs aiming point and entry points correctly, but I haven’t shown the OL movement.

We, and countless other teams have found that the BANG, BEND, BOUNCE concept for running backs speeds up their reads, and results in greater gains for your Inside Zone plays.

The window dressing and various options when running IZ

At a coach/coordinator level, we must really start to think about the window dressing we use around these plays. I mean formations, motions, reads, triple options, these are the thoughts that need to go through your head when game planning for your opponents.

Do you have a TE, can he also play FB, do you have 2 FB’s, can you go empty and run your QB?

All of these are possibilities, using the exact same blocking scheme and play nomenclature. So let’s have a look at some of the options available to you.

Spread Offense Zone Packages

As the spread offense becomes more and more prevalent throughout football, especially college football, the advances and innovations to the inside zone have become one of the biggest parts of the game. Let’s look at some of these innovations.

[NB: When I say spread offense, I use the term loosely, as you’ll see from some of the examples I’ll use, I have covered off a myriad of different offenses under the spread offense banner. This is a deliberate ‘mistake’ for ease of writing and reading, I’m fully aware of the many different brackets and types of offenses run today.]

Singleback Zone Read

Let me start by emphasising the fact that this is not called ‘read option’, the read is the option, calling it read option infers a triple option threat, i.e the read, then the option, and that is covered under triple option below.
Rich Rodriguez is credited with creating and utilising the zone read during his times at Glenville State, Tulane, Clemson and most famously with Pat White at West Virginia.

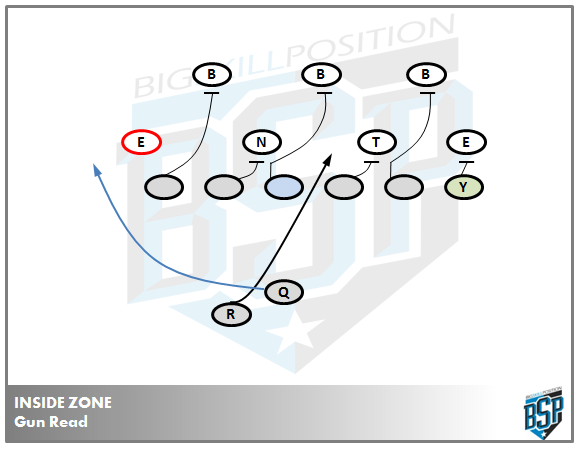
The zone read uses the standard inside zone blocking rules as identified in previous articles, but also utilises the quarterback as a running threat.

Fig 4.10

You can see in this example, from a standard shotgun set, the QB uses the backside defensive ends alignment against him, and simply ‘reads’ what he is doing, it provides a very simple rule for the QB:

If the DE goes upfield – GIVE the ball

If the DE crashes – KEEP the ball

Obviously this has been massively successful throughout all levels of football, and has been modified to do the same thing out of the pistol formation too, as can be seen below:

Fig 4.11

This option was first used by Chris Ault at Nevada, notably with Colin Kaepernick at quarterback, and was extremely successful, here is an example of the ‘Snatch’ technique they talk about. Whilst it looks like a read, the reality is the don’t read every play, they tag when they want to read and when they don’t, but use the same technique throughout.

This allows us to keep 6 on 6 blocking the Inside Zone play, whilst reading the backside DE.

What we have seen over time is defense becoming more aware of these schemes and evolving, either teaching the DE to ‘slow play’ the read and delay the QB’s decision making, or through gap exchange with the DL and LB’s.

This leads on to the next development of the Zone Read

2-Back Zone Read

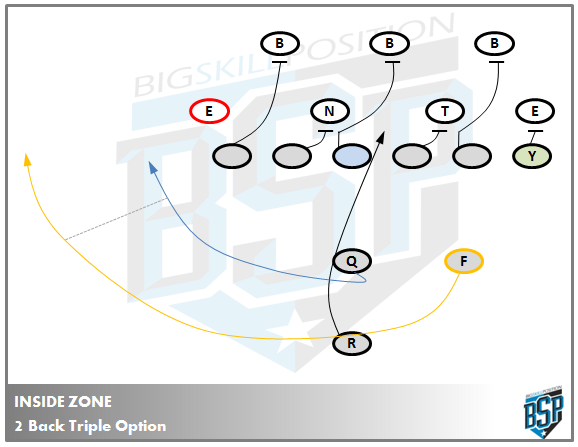
The 2-Back Zone read game allows offenses to better match up to good defenses, and it provides a vast array of options that can be added to your game, to really mix up your play calling.

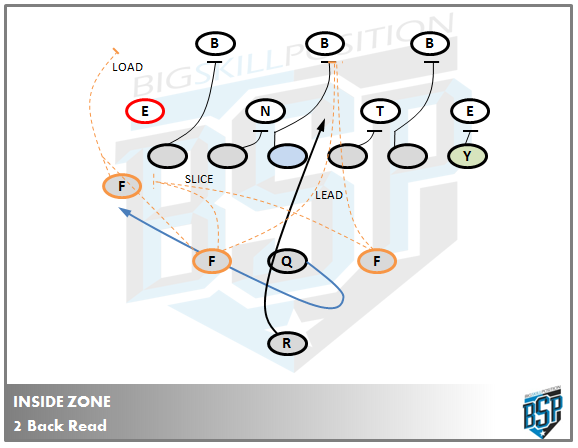
For example, if you take the standard shotgun zone read above, and add in a Fullback/H-Back, you can make the same play look so very different to the defense. Multiplicity with Simplicity!

Fig 4.12

You can call:

LEAD – Tells the Fullback to lead through the PS A Gap

SLICE – Tells the Fullback to block the Backside DE

LOAD – Tells the H-Back to leave the DE and block first force defender.

If the above is “Pro Rt. 22 Zone”, we can tag the fullback to give us very different looks, yet highly successful plays.

“Pro Rt. 22 Zone ‘Lead’” – we now have 7 v 6 blocking at the POA

“Pro Rt. 22 Zone ‘Slice’” – now we can still read what the DE does, but we have a body blocking him. The same read rules apply as before, but now if the DE goes upfield, the QB keeps it and runs off the FB block.

“Flanker Lt 22 Zone ‘Load’” – Now if the read dictates the QB keep the ball, we have an additional blocker in front, taking the first force defender.

The real benefits to this type of zone read is the seemingly multiple plays you can run, and run well, with a minimal installation time. This is absolutely vital, especially for coaches in Europe and High Scholl coaches who have very little time with players.

Again, we can see the same options available from a pistol set:

Fig 4.13

I’ve shown the Fullback or H-Back in multiple positions on these diagrams, but obviously only 1 position would be used.

You can immediately see some of the benefits 2-back sets have in the read game, especially when it comes to multiplicity. I’ve explained the 3 different types of plays, but think of the formation you can run them from:

King (Fullback to same side as TE)
Queen (Fullback opposite the TE)
Flanker (Fullback aligned in a wing position)
Trips (2 receivers and TE on the same side)
Wing (Fullback aligned outside the TE)
Pro (Split backs)

These are the top formations that these plays are run from, and we can see that through installing the Inside Zone concept, we are learning one concept, whilst making the defense prepare for 18 different looks. It’s a very powerful concept to use.

Pro-Style Zone
One of my good friends, and former coaches, is Coach Stephen McCusker, who is one of the most respected coaches in Europe.

He is one of the few British coaches to coach at the professional level, as Special Teams Coordinator o f the Scottish Claymores, at international level, as the Offensive Coordinator of the Great Britain Lions for many years, at the youth level, with Team Scotland, and at the Senior level, in his current role as Special Teams Coordinator of Premier North Champions the East Kilbride Pirates.

Coach McCusker has kindly put some notes together about the Pro-Style Inside Zone he likes to run, some of the variations and has had much success with over the years.

Coach likes to have his aiming point as the first defender past the centre, and he prefers to run it at the B-Gap defender.

Here are Coach McCusker’s rules for the OL, FB, Running Back (Tailback here) and Tight End.

Fig 4.7

The base play here will end up looking like:

Fig 4.6

You can see, as we are lined up in a Weak-I formation, the FB has the backside cut-off of the DE. This allows for the OL and Tight End to be able to block 6 v 6 in the middle, a strong position to be in.

Coach also has a ‘plus’ tag for the FB, which can be used if the first force player is disrupting the play, and cannot be blocked by the WR receiver (Note: adding the plus tag also allows tells the WR to block second force)

This allows for us to gain an advantage and load the playside ending 7 v 6 in the box in some situations, as shown below. Obviously this is a nice change up to initial ‘Minus’ or ‘Slice’ blocking by the FB.

Fig 4.5

Coach McCusker emphasised the importance of the QB boot “The QB owns the backside DE on the boot (also EVERY time he hands off on the zone). The QB gets his head around and finds the BS DE. He should be able to tell the coach where he is and when he should start to think of calling the boot”

The Zone Package

One of the big things coach preaches is not just having an inside zone play you are committed to, it’s having a package of plays to compliment and work off the base zone play. Having variations on it.

Whether it’s from a single back or 2 back set, spread or trips or double tight. These are all simple, easy to install options that keep the defense guessing and keep your offense fresh.

Adding in Boot, Slice and Reverse are all plays that coach likes to use as part of his ‘Zone Package’ and add a powerful play action passing game to your offense.

“Strong Rt. Open Boot Lt. Slice”

Fig 4.8

One of the main coaching points here is to look at the QB’s progression, from Flat to Over, rather than working from deep backwards. Something Coach McCusker emphasised with this play is his philosophy of always take the completion first.

“Weak Rt. Open Boot Lt.”

Fig 4.9

“Trips Rt. Zone Rt. H Reverse”

Fig 4.20

“On the reverse..” McCusker states “The QB fakes zone, then the Slot in Trips comes back behind the QB to fake or take the reverse. The QB then settles straight back to set up to throw (behind the B Gap).

The OL run the Zone, but the BST loops round and ambushes the BSDE, or if he bites, leads up on the OLB on the side.”

Triple Option

The triple option has been around for years, and will continue to be so for many years, for one major reason. It works!

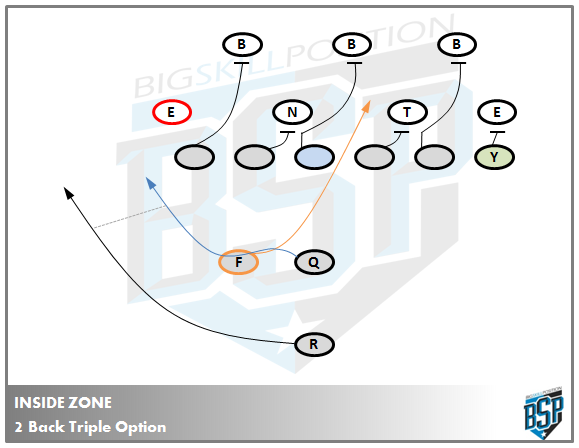
Again, this is building from what we have seen in the single, and two-back variations of the inside zone, and looking at just a few of the possibilities open to you by utilising the Inside Zone.

Fig 4.14

Here we can see we still have the regular Inside Zone read with the FB in a shotgun alignment, and the Running back becomes the pitch man in the event of a keep read. In these cases the read man is the backside DE, and the pitch man will be the first force player, likely to be a safety.

This is an excellent play call with a running quarterback and/or against a good gap exchange team also.

If you have different personnel groupings you can also substitute in your #2 back to act as FB and take the handoff. It’s just another way to get your best athletes on the field.

Fig 4.15

Here is an example of a variation on the Inside Zone Read. Again, this is a very good play to run with 2 RB’s on the field.

It’s also possible to put motions into these plays, and you can see the immediate benefits to that also.
Finally, and a bit more outside the box thinking in this one, is using the WR as the pitch man, as you can see here. It’s a play I would run more to the boundary than the field due to the width of the receivers, but is extremely easy to swap sides.

For example, I have shown Spread Rt Triple Option Left. We could just as easily run Spread Rt, Triple Option Right.

In that case the DE over the TE would become the Read man, and the corner over the Z would be the first force, or pitch player.

Fig 4.16

As you can see, one of the focuses of modern day football is to run the same play, but get the defense to react in different ways to that play. Above I have shown how we can do that with single back, 2 backs, pro style and finally, the triple option.

Below we’ll now look at one of the newer facets of the game, combination or packaged plays.

2 in 1, 3 in 1, 4 in 1 plays

Combination plays are a relatively new invention, which seem to be credited a lot to Dana Holgorsen from his time at Oklahoma State and now West Virginia.

The essence of these plays is a numbers game, based on the number of defensive players in the box, if there are less than 6 players in the box we run the ball, 6 or more, we look at passing.

Fig 4.18

As we can see above, it’s a concept as old as the spread offense itself, and worked for a long time, until defenses started shifting their methodology, why should they give them a clear read pre-snap?

So defenses started becoming more mobile, OLB apexed and blitzed, with the safety rotating down, confusing the QB’s read, and resulting in tackles for a loss.

As a way to solve this, we can now incorporate a Bubble Screen or Fast Screen (Outside Receiver Screen) onto the backside of zone run concepts, especially out of Shotgun or Pistol sets.

Fig 4.17

Here you can see, we have turned the Apex defender into a read. If he turns his hips, to drop to his passing zone, we give the handoff, if he stays to play the run, we throw the Bubble. A very simple and easy to install play onto your existing zone play.

Here we can see some clips of this play at the NCAA level. You’ll notice how easy it is to add in motions to fully utilise your existing formations, and still have the same concept being run.

But what if you have an athlete at Quarterback and you don’t want to lose him as a threat?

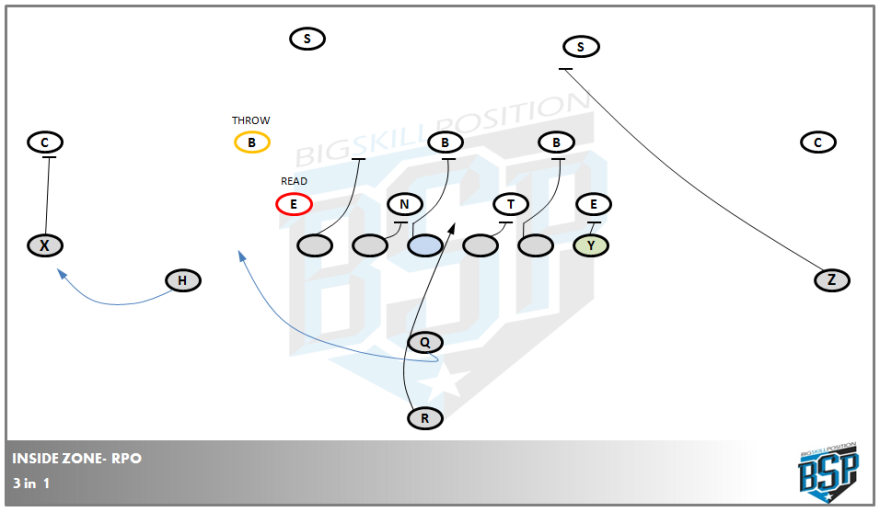
3 in 1

We can take the simple play demonstrated above and add in a zone read with the QB. Like so:

or in the NFL (with what I would say isn’t the most athletically gifted Quarterback ever seen):

Fig 4.19

Here we can see the play drawn up, and can easily dissect the options available:

1. DE plays upfield, forcing the GIVE to the running back
2. a) DE crashes in forcing the KEEP, then the force player is covering the Bubble, so remains a KEEP.
2. b) DE crashes in forcing the KEEP, then the force attacks QB run, so throw the Bubble.

This is good play to throw in and mix it up with the other plays described above.

4 in 1

Credit here must go to Hugh Freeze, not just for having one of the coolest names in football, but for really understanding this concept and how it can work.

The 4 in 1 takes all the advantages of the 3 in 1 play above, and adds in a backside curl route as the 4th option.

Fig 4.20

This really pushes the whole “Numbers” game to a whole new level. Essentially the reads now become:

<6 defenders in the box = Run the Read option

6 or more defenders in the box = Pick the best option between Bubble or Quick Hitch.

And it really is that simple, as you can see here:

What this clip demonstrates is that you can leave this one play on the pitch, and run it multiple times quickly, forcing the defense to stay in the same personnel and likely, front.

You can see above, Ole Miss run this play 5 times in a row, and score on the final play. That’s 5 plays in 1:27 real time! That’s tempo.

This article is by no means an exhaustive list of all the ways to run Inside Zone, more a suggestion at some of the ways I’ve seen work, and a brief explanation of them.

Summary

What I have tried to show above, is by no means an exhaustive list of all the ways to run Inside Zone, but instead a series of ideas of how to open up your playbook to incorporate the zone, and make things simpler for your offense.

Adding in constraint plays like the bubble is a handy thing to have, but if you add it onto a zone play, and build from there, you can very easily make simple and easy to remember plays for your offense, but give the defense a multitude of things to worry about.

You can also take the ideas shown above and build on them. What if instead of running the Bubble to the backside, we get the outside receiver to run a fade? You can see how quickly things can open up.

I realise this was a long article, and appreciate you taking the time to go through. I’d love to hear your thoughts on some of the ideas I’ve discussed, and once again a massive thanks to Coach McCusker for helping out with this article.

The Inside Zone – Individual Video Clips

As you may well have guessed, I’m a member of X and O Labs and the wonderful things Mike Kuchar and the guys are doing. As such, it would seem I’ve unwittingly copied their style, but with a much more monotonous voice.

My apologies for this, these are the first 2 videos I have made, and I’ll work to make them better as we progress, although there is only so much I can do about my voice.

Here I’ve uploaded 2 videos to show some of the common mistakes I’ve found this year, and some of the better blocks I’ve seen this year.

I’ve tried to make best use of the clips we had available, but I couldn’t ever get good angles on the same player from the first to the last game to show the progression, so I’ve used 2 different players.

We are implementing the Inside & Outside Zone over a 2 – 3 season timeframe. We simply don’t have the time with the players to be able to coach everything we want in, and be able to execute it to a satisfactory level. So this year was the just the very very basic, next season will progress a lot more, as we now have a base knowledge level we can work with.

INSIDE ZONE WRONG

In this clip you can see our LT (despite me saying LG in the clip!) making some pretty basic mistakes on our Inside Zone play.

This was from the first game in our season, and our first time running it. It’s a good example of how good players can make life hard for themselves.

INSIDE ZONE RIGHT

In this clip you can see our RG make some excellent blocks, showing off some pretty good technique along the way. It’s not perfect by any means, but you can see the basics of what we are coaching throughout

This was from the last game in our season, and shows the progression from Week 1.

Again these are the first videos I’ve made, so I can only apologise for the quality. Hopefully these will get better as we progress.

The Inside Zone – Article 3

The Inside Zone

So after a hiatus of a month or so, we’re back with the final technical OL article in the Inside Run. The next article will look at some standard inside zone plays and variations on those plays, before we turn our attention to the Outside Zone and Pass Protection.

In the previous two articles we have established the zone block and associated terminology, then we looked at how we execute the zone block, how it ties into double teams (how base and zone blocks work together) and the circumstances where it doesn’t work.

In this article we are taking those concepts forward a step, and looking at what the defense can do to disrupt them, and how we can counteract it.

Dealing with Slants and Stunts

As we all know, the defense very rarely line up or reacts like we have drawn it up in our playbook. If your offensive line are confused when a defense doesn’t line up as expected, then it’s a sure fire giveaway they were learning the diagrams in the playbook, and not the scheme.

How the offensive line reacts to stunts, twists and blitzes by the defensive line, is also an indicator of how well they know the scheme, and also, how well they can execute it.

This is where having a zone based run game comes into its own, as the scheme dictates player are blocking a zone, and if anyone enters that zone, it’s their block.

Obviously that is a very simplistic way of looking at it, but essentially it holds true. This then, is the ultimate test of both the Offensive Lines’ ability to react to a changing environment, but also, of your coaching at the position, and your coaching of the scheme.

Instead of looking at each stunt in great detail, I’ll cover off the key coaching points for a DL slanting. When we have discussed this, we’ll then look at how that applies to the Inside Zone details we’ve already covered.

Defensive Line Slants

For me the most common, and possibly disruptive thing a DL can do against an OL, is slant. It is a pure guessing game for the DL as to whether they are slanting into the play or away from it, but when they get it right the results can be devastating (https://www.youtube.com/watch?v=MIu22jokKKk).

These are fairly simple to understand, as all that happens is a defensive line slants in one direction (generally given as weak or strong) and the LB’s fill the gaps left by the DL. A standard gap sound scheme.

Fig 3.1

This provides a lot of opportunities, as you can see above. I’ve drawn this out of a 3-4 front, but it can be just as effective out of a 3-3, 4-3 or 4-4.

The advantage this gives the defense is that it places the defensive line, in between offensive linemen, on the same plane, within the first 2 steps of any play. When we couple that with an offensive line that is worried about what way the DL is slanting, and where the blitz is coming from, you can see the benefit.

It allows defensive co-ordinators to attack the offense, without having to commit to blitzing, whilst remaining defensively sound up front, i.e proper gap responsibility. It is also extremely effective without stud defensive linemen, as they are attacking the gap, rather than the man, so they don’t need to play the plate and beat your offensive lineman in order to win.

How can we defeat that?

Zone blocking schemes are designed to cancel out any slants from a defensive line. By simply taking your zone steps, it puts you in the correct position to react to what the defense does, and react quickly.

So if the players understand that the scheme works in all circumstances, then it comes down to execution of the play, and that is more a physical trait than a mental one, however, I’ve found a small change in thinking, can provide a big change in the physical output.

Another train of thought I teach my OL, is always plan for the worst case scenario.

Fig 3.2

If we are running Inside Zone to the right, for me this is the worst case scenario.

It’s going to end up with the either no-one blocking him, both players blocking him (so no-one goes to second level) or the guard, not expecting contact so quickly, getting hit in the mouth and defeated by the block.

As someone who has been in all 3 circumstances, I can tell you #1 and #3 are extremely embarrassing, however if it’s coached right, it shouldn’t be an issue.

The coaching emphasis has to be on trusting the zone steps and hand placement that we drill every single practice. The reason we keep these so simple (STAMP, SHOOT, SQUARE) is so they are easy to remember, easy to execute and easy to self correct throughout practice and a game.

The more we drill these steps and combinations, the more natural they become, until eventually, the guys aren’t thinking about them, they just do them. Once they are at that stage, they can then react quick enough to block all slants and stunts.

Let’s look at an example.
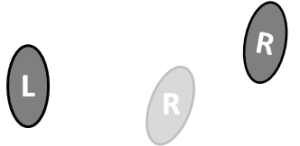
Fig. 3.3

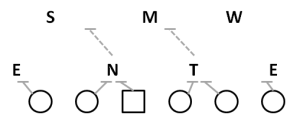
Here we can see a typical situation for an inside zone to the right, and I’ve highlighted in blue what we as offensive linemen think the DL will do. We imagine they will play their gap responsibilities, and it’s all nice and simple.
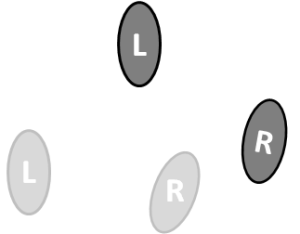
So pre-snap, we are communicating that the RG has a SINGLE block, the C is ZONE-ing looking for the LB, and the LG is likely double teaming with the LT, so he will have a BASE block.

All that makes perfect sense and we are nice and comfortable, ready to go. But how do guys react when this doesn’t happen, what if post snap, the defense does this:

Fig. 3.9

This is where practice and preparation comes in. This is just as simple to deal with as the expected scenario above, it just requires execution and good reactions.

It all starts with the RG in this scenario, he must call this slant out, immediately to attract the C to the block.
The RG immediately goes from a SINGLE block, to a BASE block to set up the combo. His job is slow the DT’s advance into the backfield, and allow the C to come and pick up the block.

Once the C has taken over the block, the RG is free to jump to the 2nd level and block the LB.

It all sounds simple on paper, but with enough repetition, it can be simple to execute also.

THE INSIDE ZONE

Zoning is not just one style of block, it’s a combination of many different types of blocks, but the key to a zone block is to never go against the grain as an offensive lineman. The minute your first step goes away from the playside, it becomes a Man blocking scheme, not Zone.

I have 3 different types of blocks ZONE, BASE and SINGLE.

ZONE is used by a trail or uncovered man.
BASE is used by a lead or covered man.
SINGLE is used by covered man, when his backside teammate is also covered.

These three blocks can unlock the Inside Zone scheme for your team, assuming you rep them enough during practice.

COACHING THEORY and TERMINOLOGY

Good repetitions are key, as is consistent terminology across all coaches who will be speaking to the OL.
One of the biggest issues I had as a player was the OC and the OL Coach using different terminology, it slowed down my progress trying to figure out what I was doing right and wrong, and they had different ideas about what was right and wrong.

Over the past few months, I have been looking a lot at Darin Slack’s C4 (and R4) stuff for Quarterbacks. For those that don’t know Darin, he is a wonderful teacher and just a great coach and person, who has put in a lot of time and effort to come up with a self correction method for teaching his QB;s what they are doing right and wrong.

The key to this system working is a common terminology between player and coach. If both can identify the same areas of a throw and fundamental movements, they can correct mistakes, and the QB becomes a better overall player.

The same is true with OL, and I implore you as coaches to develop your terminology, and emphasise it at every opportunity. The more your players become engrossed in that language, and associated movements, the easier it becomes to identify issues and solve them quickly.

Now I’m not claiming to have anything like what Coach Slack has developed, it’s nothing like it. What I’m pointing out is how critical terminology is, and how it can help you in your practice.

We want to get as many reps in as possible at practice, as usually across the UK and Europe we get anywhere between 3 – 8 hours a week with our players. So is it easier to pull a player to one side and walk him through everything that was right and wrong in that drill rep he just had:

“Right Jimmy, i really liked the way you finished the drill, but you need to focus on your steps more. You didn’t gain enough ground with your first step, and your 2nd step was too shallow, so you didn’t get a good enough impact on the bag, and really struggled to move it, didn’t you?”

“Yeah, coach”

“Right, so next rep let’s focus on those steps, and get a good rep in, OK!”

Or is it easier to simply say:

“ Jimmy, good finish, but slow STAMP step, that affected your SHOOT step and impact. Work on it next rep”

It’s simpler to say, easier for the player to understand, and crucially, doesn’t involve you stopping a drill to explain it to the player. It’s coaching on the fly, and it’ll double the amount of reps you can get in practice.

Terminology, it’s critical. Even at the amateur level in the UK and Europe, Football isn’t just a game anymore, it’s a language and a series of never ending series of marginal gains.

The Inside Zone – Article 2

The Inside Zone

How do we teach the Inside Zone

As with most things in life, the longer you do something, the better you become at it

A recent X&O Labs study showed that 58.4% of high school and college coaches in the US now use Zone running as the main blocking schemes. With 75% of those coaches stating that it has to be one of the top runs in your offense in order to be successful.

“The more you run it, the better it becomes” is something which is found in almost all my scouting reports to our offense about these plays.

By running it more, and using less run plays, you are then immediately faced with two problems:

1. If we aren’t perfect at understanding this concept, our entire run game won’t be good
2. It won’t take long for defensive coordinators to realise you only have 2 runs, and be able to stuff both quickly.

In order for both of these to become less of an issue, you need to:

1. Have linemen that understand the system perfectly, not just learn from pictures
2. Run the Inside Zone a lot, it doesn’t matter what the defense does. The more you run it, the more effective it becomes
3. We must not allow negative yards on any Zone play.

When I say “The more you run it, the more effective it becomes” what I mean is that the defense is not going to do the same thing all the time. Sometimes they will bring pressure, sometimes they will slant. The more you run this, the more likely you are to burst a big run.

There are several different ways of teaching the zone, and how and who to block. The two most common are using the Covered/Uncovered principle, or the numbering system. Here we will look at both.

COVERED/UNCOVERED

Covered/Uncovered is my favourite way of teaching Inside Zone. It requires almost little to no knowledge about defenses to be run properly (from a player point of view), and it tells you what block to use, not just who you are blocking.

The starting point for it is to look at what Covered and Uncovered mean.

What does covered mean?

Generally speaking, at some point everyone will have heard, or used the phrase ‘your covered if there is someone in front of you’ or something similar. This is still pretty much true to this day, but we can simplify it a bit more whilst capturing more information.

As an offensive line, you need to be a cohesive unit, which means you must know and understand what the players round about you are doing too, so understanding if your playside and backside teammates are covered is just as important as knowing if you are.

With that explained, knowing if you are covered is a simple man-on to man-over principle that utilises the even gaps spread across the line.

Fig. 2.1

Each man on the line is responsible for his zone or gap, as shown above. That’s the premise of any zone play, as described in Article 1.

So you are covered if you have a defensive lineman within the zones defined above. Worth noting that your zone goes from your nose to your playside teammates nose (centreline to centreline) and is only 2 yards deep.
Now we understand the principle of covered, lets look at how we incorporate that thinking into the inside zone, and the types of blocks required.

Block Types

Every time we run an Inside Zone play, our linemen should think only 2 questions:

• Am I covered?
• Is my backside teammate covered?

These questions will determine what type of block/steps you have, there are only 3 options at the start of any play, and by the time you’ve ran this for a few weeks, your OL will begin to become a lot faster at recognising what’s going on.

The options for blocks are:

Fig 2.8

What this table shows is all the answers to the two questions above exploded out to show every conceivable option. This establishes that there are 3 types of block possible in the inside zone (Base, Zone, Single) and 2 types of footwork to learn (Base and Zone). We’ve covered the zone footwork required in Article 1, so now let’s look at the base footwork, and some of the finer points of the three blocks.

Base Block Footwork

Fig.2.3

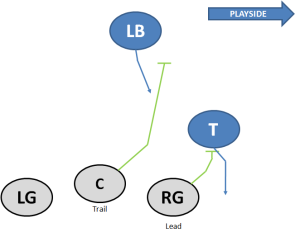
A base block is utilised when you are covered, and your backside teammate is uncovered. In this circumstance, we call you the Lead man (we’ll describe this later).

You are there to block the down lineman, until the zone player, what we call the trail player, can knock you to the playside LB. We are simply creating a double team.

Here we have a timeline of the Base Block footwork (light grey is stance through to dark grey is last steps)
What we can see is that even the covered linemen are still taking the Stamp Step and Shoot Step.

Once they have made the contact on the Shoot Step, the OL must focus on keeping a high, backside foot (or post step if you will). This not only stops the DL from crossing the OL face, it also stops the OL trying to block with two hands and turning their shoulders. Keeping square is critical to getting off to the linebacker quickly and safely.

Single Block

A Single block is exactly that, it designates you to have the defensive 1 on 1, or singled out.

The steps taken are a cut down version of the Zone steps. You still take the stamp, shoot, square steps, but make them smaller and quicker. It is more like a man blocking scenario.

The key coaching point for a single block is to have a strong backside arm, we must control the defensive lineman in front of us. Him slanting into the play is not an option, so a strong punch and follow up are required. Punch with the playside arm, then immediately follow up with a backside punch to the numbers.

Lead Man/Trail Man

This is a concept we have implemented late this season to help our linemen know what block to use. If you are Lead man, you are Base block, Trail man, you are zone block. It also helps to emphasise the double team concept of Inside Zone that is vital to it working well.

It is the Trail man’s job to get onto the back hip pocket of the lead man, not the lead man’s job to slow down.

Fig 2.5

What you can see above is a good demonstration of the Lead/Trail concept against a standard 4-3 look. You can see the covered linemen (green above) become the lead men, and the uncovered men become the trail men.

Lead Man = Base Block = Base Steps

Trail Man = Zone Block = Zone Steps

Aiming Points

Where an OL aims and blocks the DL is just as important as how he blocks him. Aiming points for the hands must be small, as if you aim small, you’ll miss small.

We teach the same aiming point for the Lead Man and Trail Man in the Inside Zone:

“The top corner of the playside number.”

If we look at the dummy here, you can see the two aiming points for a zone right play. Obviously we would use the left top corner for zone left.

What this provides is a small target for offensive lineman; it acts like an archery target. The middle of that circle is a 10, it is the optimum point to hit and move the defender with your punch. The further out you go the less effective your punch becomes.

If you are the lead man, you punch with your backside hand only. As I explained above, this coupled with your footwork will be enough to keep your shoulders square to the LOS, and in a good position to attack the LB quickly and safely.

Fig 2.4

The initial contact points for a Single block are different. As mentioned above, allowing the defensive lineman to slant inside is the worst possible outcome for a single block, so we must have a strong backside punch to eliminate that threat.

Fig 2.6

Here we can see the initial aiming points for a Single Block on an Inside Zone to the right.
We must note that:

• The playside hand punches the top corner first.
• The backside hand punches the lower corner immediately after
• These are initial aiming points. Once that inside movement has been taken away, the OL must reset his hands and lock-on to the defensive lineman.

That covers a lot of the finer points about the Covered/Uncovered method and how I have taught it, and had some success with it. Now let’s look at the numbering system.

NUMBERING SYSTEM

One of the most common ways to run the Inside Zone is to combine it with the Covered/Uncovered principle stated above.

So if we rework an earlier diagram to include the numbers, and the lead trail concept, we get:

Fig 2.7

What this shows is a process, whereby the centre calls out the zero player (i.e “Mike is 53”) then each player can ‘count’ outwards to his particular block.

This is easily applicable to any defensive front you are likely to see. It works like so:

Centre = the ‘Zero’ Player

Guards = the ‘One’ Player

Tackles = the ‘Two’ Player

TE/FB = the ’Three’ Player

These provide hard and fast rules about who you are meant to be blocking, and it works extremely well at the college and professional level, where they have multiple defensive looks, and have almost unlimited time to scout opponents.

At the UK or high school level, I have some reservations about running it.

Firstly, it requires your centre to be pretty ‘football smart’ in order to call the right ‘zero’ man. If he gets that wrong, the whole thing can fall apart.

Secondly, it focuses players on a man rather than an area, and it can turn into a man blocking scheme if not coached well.

I like the numbering scheme when used with covered/uncovered. It acts like an indicator system, it indicates what player you are likely to be blocking, then you use your covered/uncovered principles to figure out how to block him and what steps to take. That’s a pretty flawless system.

Of course, both these systems look great on paper, but what happens when a defense moves, or slants, or blitzes, or drops?

In the next article we’ll look at some clips of the Inside Zone working and not working at the UK/High School level and how we react as offensive linemen to defensive stunts and movement within the Inside Zone scheme.

The Inside Zone – Article 1

The Inside Zone

This has to be one of the most talked about, researched, and still least understood concepts in football. On virtually every football website, there is some form of Inside Zone study, or presentation, so I figured I’d join in, as it’s still a pretty hot topic, and hopefully shed some light on the topic.

I’ll go over some of the best practices I’ve found through teaching the Inside Zone, and show some game clips. What you’ll see is a vast improvement throughout the course of the season from the first time we ran IZ to now.

Before we get to that though, let’s go through some of the details behind the Inside Zone, where it came from, the two most common ways of teaching it, and the different ways it can be run.

Where did it come from?

“…..it’s just one of those things that football has always had” is a phrase that annoys me. We haven’t always had these schemes and plays they were invented by someone, and I want to know who it was, why they needed to invent it, and how they used it.

By having that base knowledge, we can successfully understand the basics of the scheme, and from there, gain a better understanding of the tweaks and flavours that others coaches have put on it over time.

The Inside Zone originated in the 90’s and 00’s in college and the pro’s off the back of Alex Gibbs Wide Zone scheme, right? Everyone knows that!

BSP - IZ 1.1

The figure above is an excerpt from Vince Lombardi’s playbook that was used for the 1966 season in Green Bay. The last term is critical – ‘Zone Block’, this is what we are looking at. Now Lombardi didn’t have a zone play as we know it now, it was used more as a blocking style against certain fronts, but still it was there. The great man himself utilised the basis of a zone scheme nearly 50 years ago, and to this day, we are still discussing the ins and outs of it.

The problem, as it was, was that the defense always seemed to have a man over, they always had one extra man in the box that we couldn’t account for in blocking, mainly because of the quarterback, and the extremely low percentage chance of him actually keeping the ball on his run fakes. The defense had all the power. We were playing 10 v 11 football on running plays.

Tell me if this blocking scheme looks familiar:

Fig.1 ISO Play

It’s an old school 26 ISO play with a man blocking scheme. We are double teaming the big guys, to move them, and come off to the linebacker, leaving the outside linebacker isolated 1 on 1 with our running back ‘in the hole’.
The other issue with this type of play, and indeed scheme, is there are a lot of IF/THEN statements just to be able to run it:

“If I have a 3 tech then I do this”
“If there are 2 tight ends and 1 fullback then I need to look here, but without the fullback I do this”

These are some of the thoughts that went through my head when I was first learning man blocking schemes, it was a nightmare. The Inside Zone play allows the same blocking scheme to be used, no matter the personnel or the formation.

The Basics – What is it?

The Inside Zone play, allows the same type of downhill blocking as the man scheme above, but simply shifts the man being left unblocked. So instead of having ISO plays, you had Zone plays that look like below:

Fig.2 IZ

Instead of linemen blocking away from the area we wanted to run the ball, we are now blocking to that side, giving the Running Back an aiming point, and allowing him to run off that. On any given play, the RB can either:

BANG IT: Run the ball through the side called, generally the B Gap on IZ plays

BEND IT: This is the ‘Cut Back’ behind the Centre and Backside Guard

BOUNCE IT: Everything crashes inside, bounce to the outside.

What this gives us is a simple to learn scheme, with vast opportunities for multiple looks/formations/shifts and motions, whilst still allowing a downhill running game to attack the middle of the defense. Sounds perfect doesn’t it, only if it’s run right, and often.

If we look at the more detailed aspects of the play, the zone steps are vital to the zone. Below is how I teach our OL the zone steps:

STANCE

As with everything in football, it all starts with a good comfortable stance. For me, there is no exact size, or right or wrong. I like the back foot slightly turned, as it provides a bit more flexibility, and is more natural

Right Handed Stance

For us, we run everything our of a 2 point stance. I haven’t seen any reason not to so far, in fact, our run game has picked up dramatically since we shifted to a 2 point stance after Game 3 of our season. This is a coaching preference, I just feel the benefits outweigh any perceived negatives.

1.STAMP STEP
This is a 6” x 2” (approx.) ‘Jab’ step to gain lateral movement, and get us aligned moving laterally in relation the defender, we are gaining position here.

Fig.4 Slide Step

2.SHOOT STEP
This is where we make contact, shoot our hands and hips through the defender, and get some vertical displacement.

Fig.5 Shoot Step

3.SQUARE STEP
This step squares us up to our target. Now all we have to do is drive our feet, control the defender with our arms, and let the RB do his thing.

Fig.6 Square Step

It’s important to note at this point that the zone steps can vary in size ever so slightly depending on the gap you have to close to the defender. This is where coaches will need to give some consideration as to splits and depth (offset) of the linemen, and the athleticism of their OL.

The Inside Zone, much like the Outside Zone is a core running play. This means, the more you run it the more beneficial it will become to your offense. Anything outside of these two plays, can be seen as hubris, Alex Gibbs certainly thinks so.

“But we’re still leaving one guy unblocked, relying on a low percentage QB keeper to hold him, how is that any different to the ISO play described above coach?”. We’ll have a look in the next article, which will focus on the different principles involved in the OL, mainly covered/uncovered and numbering systems.