Base Blocking, Single Blocking and Zone Tracks
In the previous article, we covered the principles of the zone block and how it relates to the Outside Zone. Obviously, having all your linemen just take the same zone steps isn’t going to produce the effect we’re looking for. So let’s look at the other blocks employed as part of this scheme.
Block Type Review
Having reviewed covered and uncovered principles in my previous articles, I won’t go into detail on this principle again, but the fundamentals of it are:
- You are covered if you have a down lineman in your zone;
- You are uncovered if you don’t.
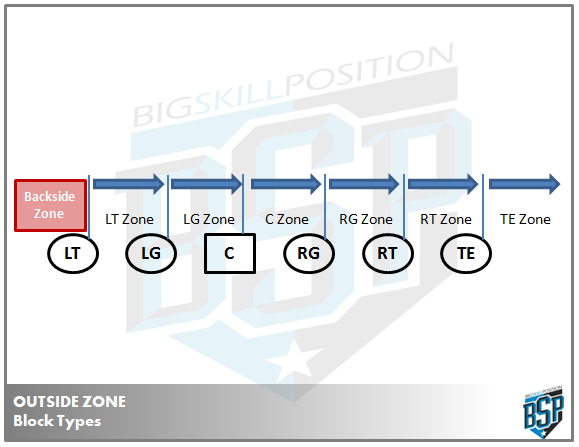
As you can see the zones run from playside number to playside number of each player, meaning if you have a heads up or backside shade on you, you are uncovered.
Understanding the basic principles of Covered/Uncovered is one thing, knowing how to implement them is another. There are only 3 different types of blocks used in Outside Zone, these are:
A Base Block is used as the Lead or ‘Hold Up’ player in a double team; you make the impact and hold up the defender until your backside teammate can take over the block. Secure the first level, looking to get to the second level.As I’ve explained already, I use the same terminology for my block types, so the players understand the role of each block:
- A Zone Block is the Trail or ‘knock down’ player in a double team. Your teammate is holding the defender up for you; it’s your job to knock him down.
- A Single Block means just that, your one on one with your man, so you need to win that block no matter what.
Base Block Footwork
A base block is utilised when you are covered and your backside teammate is uncovered. In this circumstance, you are the ‘Lead’ or ‘Hold-Up’ man.
You role is work a double team with your backside teammate, on the defender covering you. You must:
- Stop up-field penetration by the defensive lineman;
- Slow/Stop Horizontal movement
This will allow the Zone block behind you to take control of the double team quicker, and allow you to pursue to second level, whilst remaining scheme sound.
Because you are covered, you don’t need as many steps to control the playside half of the defender, so we will simply, Drop and Pop.
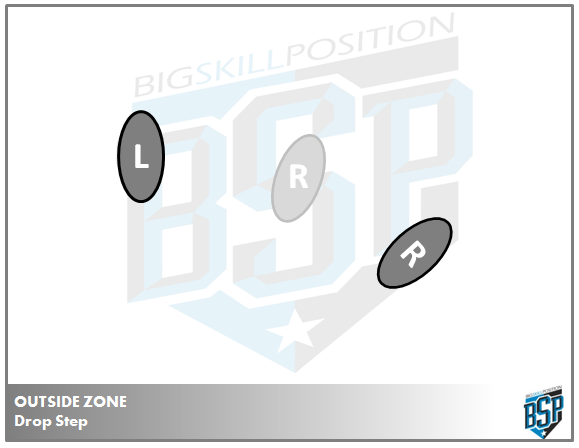
Drop Step
The drop step on a Base Block isn’t necessarily about getting width and depth, as it is about getting in a position to ‘Pop’ the defender.
For example, if the defender is tight against you, we don’t need to get much depth on that step; however we do need width to get in a good position for the pop step. If he is a wide shade against you, you will need to get depth and width, to gain ground (horizontally) on the defender, and be in a position to pop step.
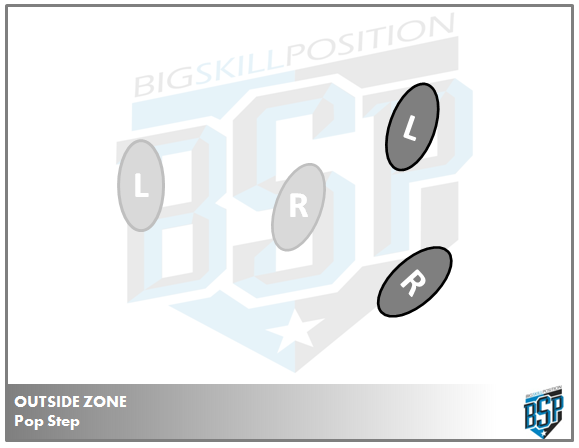
Pop Step
Again, the pop step is where we are making contact with the defensive lineman.
With the pop step on the base block it’s important to keep the backside foot up as it:
- Helps keep your shoulders square to the line in a position where you can easily attack the second level without having to adjust your feet.
- Keeps your toes away from your zoning teammate, making them less likely to get stood on and hold you from making a clean release to the second level.
Again, the role of the Base Block is to hold up the defender. I mean this in the sense of his movement; we cannot allow any vertical or horizontal movement of the defender. We will repeat the Pop Step until our backside teammate has control of the defender.
Single Block Footwork
It is rare that you would get a single block on the playside of Outside Zone. I cover it here in interest of fullness, but if you are getting single blocks on the playside, you will want to evaluate how you are running outside zone. (Red/White identification system is a good idea).
However, for a Single block, we are utilising our zone steps, but with different hand placement.
Hand Placement
As I have alluded to already, the hand placement is different for each block, as each block is trying to achieve different things. What is important across all blocks is how we strike the defender. A common problem across football is OL trying to push defenders out the way, or trying to strike when a defender is not in range.
One of the key points is how we strike the defender; we don’t want to be pushing, we want to be lifting. Coach Jim McNally teaches the ‘double under’ technique for straight up drive blocking (see the video here), we want to use the same principle, but modified ever so slightly for the Outside Zone.
Base Block
When teaching hand aiming points, I use the line “Aim Small, Miss Small”. It gives the players a defined target to aim for, making it easily fixable when they miss.
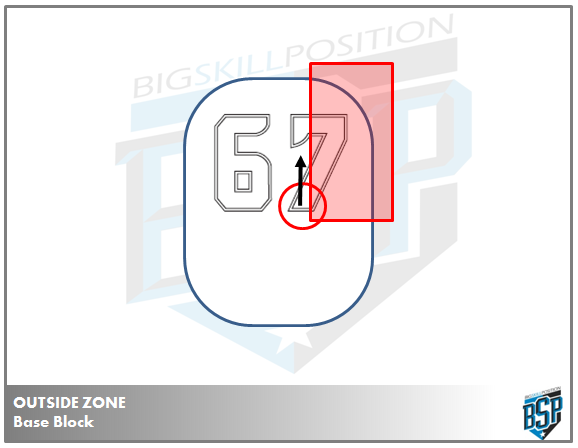
Looking at the dummy here, you can see a circular aiming point, and a shaded contact area. The aiming point control vertical movement, the contact area controls lateral movement.
Similar to Inside Zone, the circle acts like an archery target; when you hit the middle of that target, you’re punch is the most effective it can be; the further out from that target you get, the less effective you are.
The aiming point for a base block on an Outside Zone right is the bottom of the playside number as the aiming point. The arrow shows the direction your punch should be going. The punch should be timed with the ‘Pop’ step in our footwork, allowing for our hips to explode into the lineman.
As a Base Block, you are the lead man in the double team, so you are punching with your backside hand. What we want to do, and the reason the target area is so low on the body, is get our hands under the defenders pads, and lift up (think Coach McNally’s Double Under technique, but with one hand)
The more we can raise the defenders centre on gravity with this block, the easier we make it for our trail man behind us to take control of the block. This controls the vertical displacement of the defender, ensuring he gets no penetration into the backfield.
The red square is the contact area. This is the area we can contact with our shoulders and body, to ensure zero lateral movement. This will tie in with the zone block contact area, and the zone tracks.
Zone Block
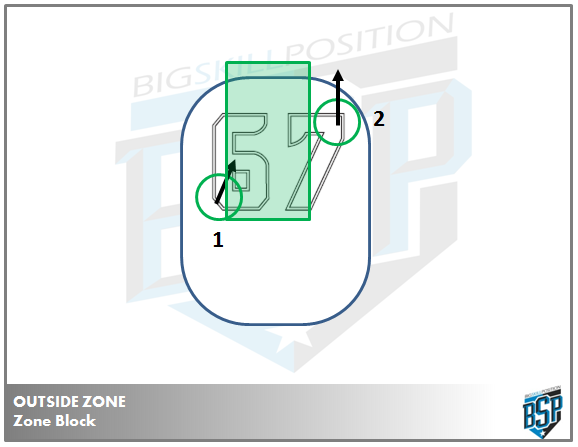
Similar to above, the circles show the hand placement targets, the shaded section is the contact area. The numbers are a timeline; left hand first, right hand second. Arrow again pointing in the direction you should be punching.
Aiming points for the Zone Block are:
- Backside hand – Outer bottom corner of backside number
- Playside hand – outer top corner of playside number
We contact low with our left hand first to ensure the defensive lineman doesn’t flow inside, thus securing lateral movement (sometimes called a ‘trail’ or ‘catch’ hand technique). We contact high with our right hand to ensure vertical displacement. Our left hand should be making contact first, with our right hand making contact to turn our hips and feet.
As I said with the Inside Zone articles, I try not to teach my players to use their head if we can avoid it, which includes using it as a gauge of positioning “i.e. head needs to be on the playside statements”. This is purely my preference. Instead I use the hand, shoulder, knee and toe as the position guideline. We want to fight to get them in a straight line, perpendicular to the defensive player. Please note this does not mean driving straight upfield, we will take the angle the offensive lineman can achieve, the key is in making a quick decision about whether the OL can get in alignment or not.
If he can get in alignment, fight across, use ‘drive the bus’ to help.
If he can’t get in alignment, kick out; use ‘drive the bus’ to help
Offensive Linemen must make this decision in the first 3 steps. This gives the RB plenty of time to see the blocks in front of him.
Drive the Bus
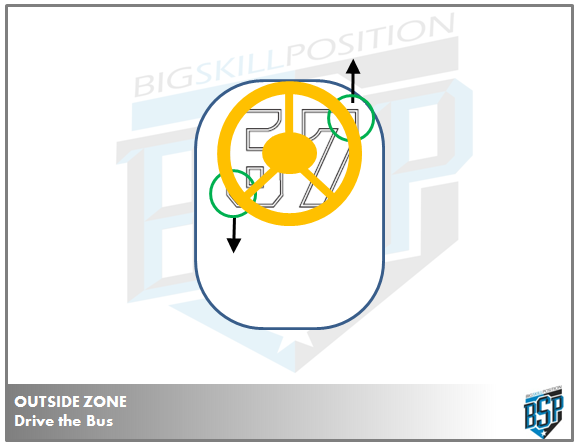
The other upside to this hand positioning is that it gives us an opportunity to ‘control’ the defender with our hands. With your hands inside, if your players are struggling to get across the defenders body into a square position, teaching them to ‘drive the bus’ is a massive help. Defensive linemen use ‘push-pull’ techniques all the time; this is the offensive line equivalent.
If we are struggling to get our hips round, and get hand, shoulder, knee and toe alignment, we want to use our hands, to aid that movement. Imagine a steering wheel on the defenders chest, we want to turn that to ‘steer’ ourselves into the correct position:
We pull down with the backside hand, and push up with the playside hand; this forces our body into the right position. Note, it is up and down, we are steering the shoulder the pads, to tilt the shoulders; we are not pulling and pushing to turn the shoulders.
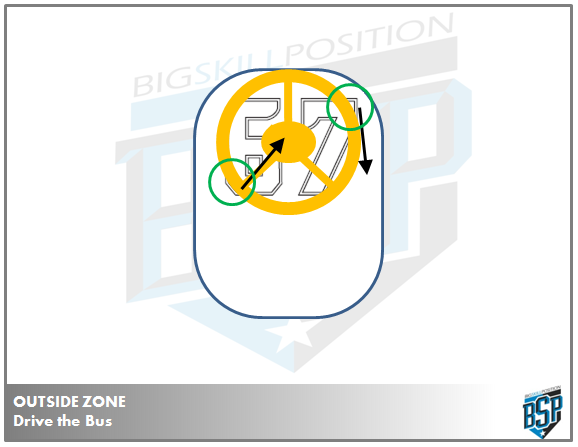
However, if after our 3 steps, we realise we cannot reach alignment with the defender, then we kick him out. With this hand positioning, it easily allows to push up through the defender with our backside hand, and pull in with our playside hand, to turn the defender and kick him out, as can be seen below.
The hand positioning of these blocks is critical as it allows you to:
- Ensure horizontal and vertical displacement
- Drive the Bus
- Kick out.
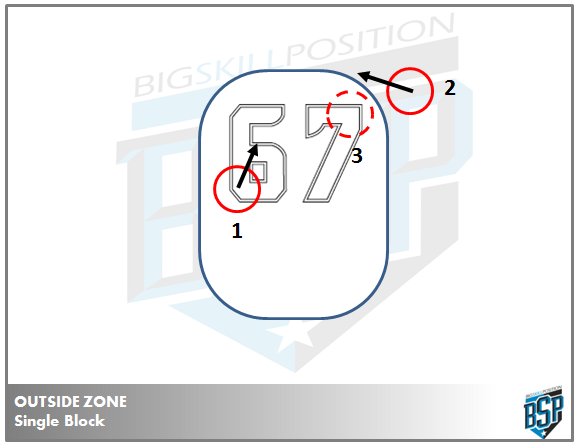
Single Block
As I said above, single blocks are very rare on the playside of Outside Zone, however, the technique is almost exactly the same as the described above, with one exception, the club arm.
We want the playside arm to come in and club the defenders shoulder, before resetting on the top of the playside number. When playing against good DL, this will give them a ‘reach feel’, making them bite to the outside, and allowing you a quick kick out block.
Combination Blocks
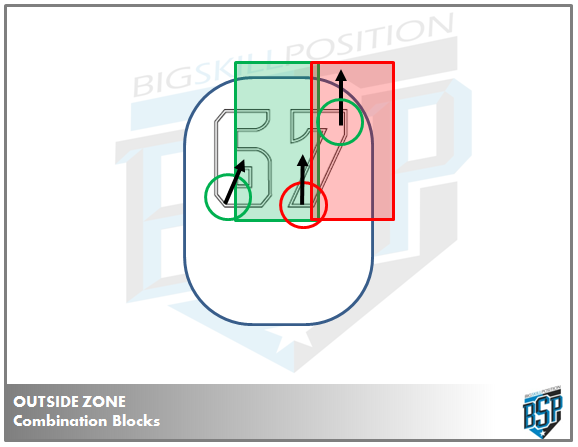
Obviously, a big part of the Outside Zone is our ability to double team defenders at the point of attack, essentially combining the Base and Zone Block. When we combine the two diagrams above, we get this picture. What this shows is the moment where the Zone Block (Green) and Base Block (Red) meet. It shows a total control of the defenders playside, with good hand placement to control the movement of the defender.
Zone Tracks
Tracks are an optional teaching point for me. It’s something to be used if your linemen are struggling to understand how the footwork and hand placement ties in with the overall concept, however they have proven to be extremely useful. I also think it’s worthwhile showing the RB’s these slides, as pre-snap, will give them a better idea of what the OL in front is doing.
For the Outside Zone we have our base track, and our zone track, and these are different. This is where the gaps are created. Look at the standard defensive look here:
We can identify our Lead and Trail men easily; this in turn identifies the tracks, with the Lead players having the Base Track, and the Trail Players having the Zone Track.
What is a standard throughout both blocks is your aiming point for your track, that is:
“The playside shoulder of the next down defender”
Base Track
Base track are created at a slightly steeper angle than Zone tracks, simple because ‘Lead’ players are closer to the playside shoulder of the down defender, as they are covered.
As you can see in the example here, the offensive player will take his drop step before anything else; this sets the edge for the track. His Pop Step should take him to a point where his centreline is at the defenders playside shoulder.
For me there are two ways to teach this to your players:
- Pop Step to the playside number of the defender; or
- Get your head to the outside shoulder of the defender.
Both statements are correct, I would use the first statement, again part of my preference for not using the head at all, but both statements are correct and will tell the players what you are looking for as an aiming point and track location.
We can see both Base Blocks identified against the example front below:
As you can see, the centreline of each ‘Lead’ player is aimed at the playside shoulder of the next down defender.
Zone Track
The Zone Track is obviously shallower than the Base block, because ‘trail’ players are further away from the next down defender. As you can see in the example the RG will Drop Step to set the edge of the track, and lock step to ‘lock’ onto that track. Again, you can see the centreline is aimed at the playside shoulder of the defensive lineman.
The Pop step should be occurring in the mesh zone, as you’ll see below.
Mesh Zone
As stated above, the whole point of Outside Zone is to get double teams at the point of attack. In the same way we merged the Zone and Base diagrams above, look what happens when we merge the Base and Zone Track diagrams:
It creates a mesh point, where the two tracks meet. This is the double team point, and where contact will happen. This creates the gaps in the Outside Zone, between the Trail man and his backside Lead teammate.
This covers off the playside element of Outside Zone. The next article will look at backside techniques we can apply in the Outside Zone, and have a look at cut blocking, whether it’s a good technique to teach, is it lazy, and does it cause more injuries.

