Over the past few articles we have focused on the playside blocking of the Outside Zone, and whilst that is a vital part of the blocking scheme, almost as important is the backside of the Zone, and what technique you employ that side.
The reason it is so important is that the ball is not meant to cut back behind the Playside A Gap, like it can do on Inside Zone, therefore it means we can tailor our backside blocking on this concept.
A recent X and O Labs study showed that currently, 42.7% of coaches are teaching a ‘Rip to Run’ technique on the backside, 33.7% were teaching a ‘full reach’ technique on the backside whilst only 15.7% of coaches are cut blocking on the backside.
There are many different ways to clock the backside of Outside Zone, and I’ll cover the most popular ones briefly. It should be noted that much of the technique teaching has already been covered in the previous articles. Specifically, Zone steps, are vital to the backside blocking, whether we are cut blocking, reaching or whatever, using the zone steps is vital to backside zone blocking.
I’d like to start however, by having a very brief look at why cut blocking is being shunned by the football community, especially at high school level in America.
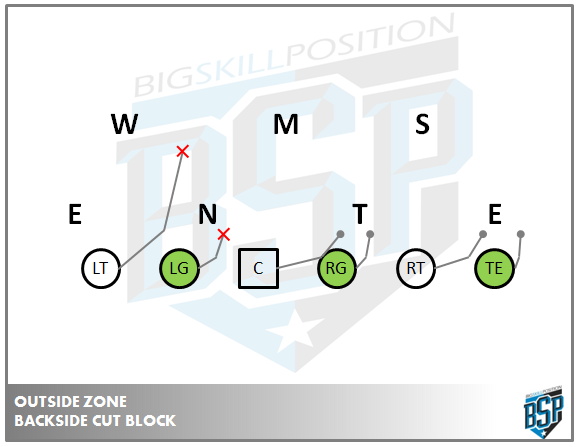
Cut Blocking
The statistic that stands out the most to me is the extremely low number of teams cut blocking on the backside.
The obvious reason for this is that quite a few states in America have banned cut-blocks at the high school level. This is due to a widely held belief that cut-blocking is dangerous, and leads to injuries.
I’m not certain that is actually the case though. At the moment, there aren’t any studies out there looking specifically at cut blocks and injuries; which begs the question how do people know that cut blocking causes injuries?
I undertook a very small piece of research into the subject, and found a study by Dr James Bradley entitled “Incidence and Variance of Knee Injuries in Elite College Football Players”. I thought this would have some interesting statistics for us. I’ve linked to the article above so you can have your own opinions, as I’m merely taking some figures from the research.
My thinking took me along this line:
If cut blocking is so dangerous, surely defensive linemen, as the position that is cut blocked the most (by OL run-blocking and RB’s pass-blocking) would have a higher knee injury rate than any other position, and quite a way higher as well.
What the above research shows is that 68% of the DL in the study had a history of knee injuries, with TE being the next highest position (64.3%) and OL third ( 57.4%). That would seem to support the theory that DL are more likely to receive knee injuries than any other position; however, when we look in more detail, that statement doesn’t stand true.
When we look at serious knee injuries (i.e. injuries requiring surgery) we see that Offensive Linemen top the charts with 21.4% of them requiring surgery. Defensive linemen come third behind OL and LB’s, but statistically not much higher than most other positions.
This led Dr. Bradley to come to the conclusion that “There was no significant association between type or frequency of specific injuries with regard to player position.”
Now, I’m aware that one study does not extensive research make, but I think it’s an interesting start. For me, given the absence of research into it, there isn’t enough evidence for me to stop using cut blocks. Concussions are a much more frequent injury, and rightly draw a lot of focus, yet cut blocking seems to get its fair share of publicity, purely based on anecdotal evidence. It seems almost dirty to say it nowadays, but I like Cut Blocking, and I like it for one very good reason:
It’s Effective!
Cut Block Technique
There are a few different ways of teaching the cut block, but I like to stick some key principles:
- Players must take 3 (Zone) steps before they can cut
- This allows them to see the defender before they cut
- Players must land on their stomach
- Helps prevent shoulder injuries, and prevents ‘rolling up’ of defender
- Players must only cut block the front of defenders
- I have zero patience for players deliberately hitting the side or backs of the knees
- We aim for where the defender will be, not where he currently is.
I’m aware that a lot of coaches break this down into 1st level and 2nd level techniques, however, as we don’t have the time to install that kind of specificity, we utilise the Zone steps we have already learned, which fits very nicely into this scheme.
Steps
In first article I spoke about zone steps and how the distance we drop varies depending on the width of the defender. The same strategy can be employed here, but it’s dependent on depth, rather than width. (i.e. if we’re blocking a 1st level defender, we don’t need to drop step very deep, however, if were blocking a 2nd level defender, we want to drop deep to take an ‘arc-ed’ path.)
What we try to do is limit the amount of techniques the players need to learn. By utilising Zone steps for both playside and backside blocking, we are able to achieve that, and have the players understand how to attack both 1st and 2nd level defenders, with employing different techniques, just minor tweaks.
In the clips below we can see the technique executed in practice. Please note, not all the linemen do the same steps here, some look as if they are crossing over and trying to keep their hips and shoulders square, whereas other are taking their zone steps. I very much favour the latter.
https://www.youtube.com/watch?v=9zewVqhzrvo
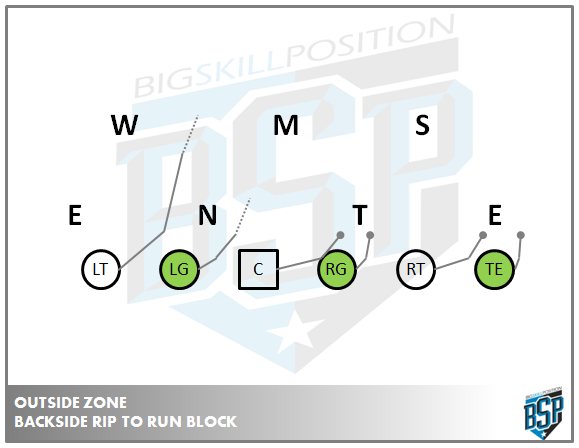
Rip to Run Technique
The Rip to Run technique is the most favoured by coaches, because it gets the job done, and doesn’t put players on the ground. The Rip to Run technique again utilises the Zone steps we discussed in previous OZ articles, but focuses on ‘ripping’ and leveraging a defender, rather than ‘cutting’ him down.
The focus is on having the players ‘rip’ with the backside arm, and lift the opponent. (Please note this is not a rip to get skinny as if rushing the passer!). The rip arm is used to make and maintain contact with the defender, whilst moving with him.
We are blocking the defender with our arm, body, and butt. Rip under the defender and control him with your body and butt. We must remain in his path to the ball carrier, as we can’t control him with our hands, we must feel his movement and where he is going with our body and butt.
We can see a walkthrough and clips of this technique here:
https://www.youtube.com/watch?v=aKgbuktxSiA
As standard practice I teach this technique to my OL first. Once we have installed the playside blocking, we will install the rip to run technique and leave them to settle with that for a few weeks. Once they are comfortable with that, we will introduce the cut block. This gives the backside players an opportunity to switch between techniques, and ‘play’ with the defender (this is useful with a more experienced group of OL, who have played together for a while, if you have a lot of rookie’s or a group in flux, I wouldn’t allow them that freedom).
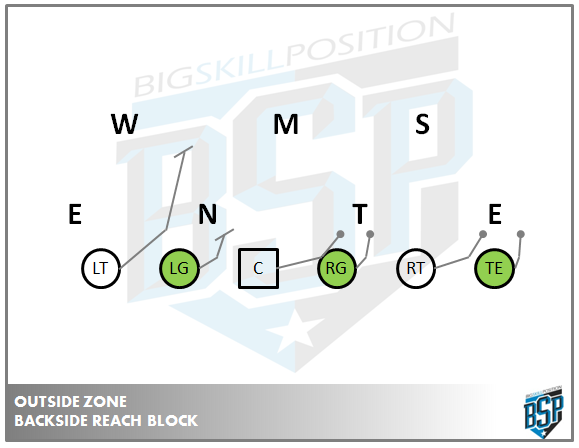
Reach Technique
This is a good technique to teach against a slower defense/defender, or against defenses that don’t flow as one would expect, an issue I’ve found a lot during my playing days.
If I was teaching this technique, I would utilise the Zone Blocking technique. It is perfect for this, as it allows you to move laterally quickly if needs be, but has the hand placements to still be able to reach block the defender. The only difference in teaching the reach block in comparison to the zone block is teaching the OL to run his feet, and get hips playside. Emphasis has to be on ‘pinning’ the defender quickly, and stopping him closing the gap to the ball carrier.
Man Blocking Concepts
Another possibility and something I’ve been looking at over the past few months is the idea of ‘man blocking’ the backside of the Outside Zone. This isn’t something I would look to install unless we were practicing every day and had the time to do it properly.
I like the idea as adding to an offensive line’s toolbox, that they can use in very specific situations.
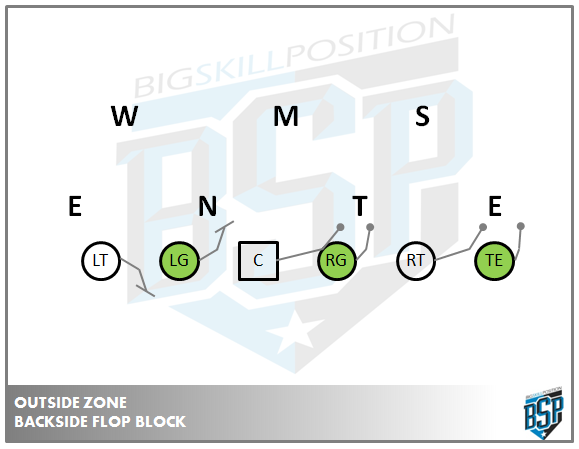
FLOP
The terminology on these can be pretty non-specific; it depends on what you are currently teaching, as I don’t use any man-blocking concepts at all, things like flip/flop/fold are all available to me.
I’d use this against a speed rushing DE, especially if you have a QB who can’t run the read option, or have the speed to threaten the edge on a rollout.
OL must take 1 drop step and cover the inside gap, to protect from the DE slanting in (same as he would on a standard zone block). He will then flip his hips, and almost pass protect the backside DE to slow down the chase from the backside.
HOLD
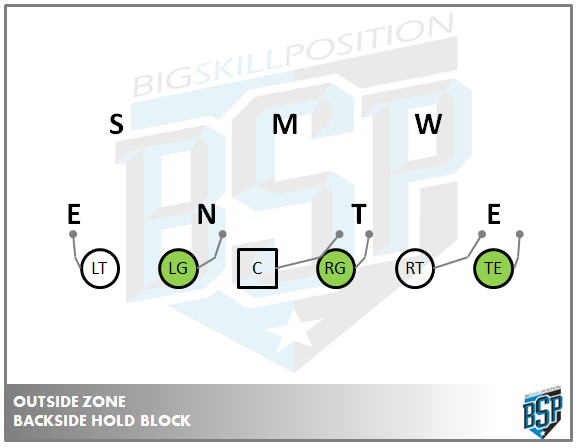
I would use this against a Sam or Will LB who is pursuing quickly, as a changeup to the typical read-option. Kick out the DE, and allow the QB to read the BS-OLB (S in diagram above).
Another good time to use this technique is when you have a bubble or fast screen on the backside of the run, and have a DE that is getting his hands in the way. Man-Blocking him (I would Inside Zone steps in this example) will keep his hands out the way long enough to complete the bubble.
FOLD
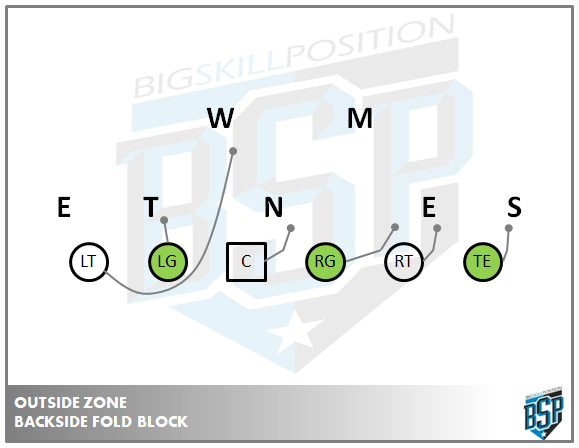
To be used specifically against a stud 3-technique player who is causing havoc on the backside. A quick down block to force him outside, with the tackle wrapping round to the backside LB. The upside to this is that it holds the backside tackle, can be utilised as a DART play in certain formations and invites the DE into a read option scenario.
It also allows us to send the tackle to a position where he can block the Weak side LB expecting the RB to make an upfield cut. If the RB continues outside, the WLB is unlikely to make a play without us gaining a lot of yardage.
That’s all the technique of offensive line play for the outside zone that I feel can be applied easily across all levels. Next week we’ll look at some of the ways we can utilise the Outside Zone from an Offensive Co-ordinators perspective.

