The Outside Zone – Article 8
Over the last few articles, I’ve covered some of the basics of the Outside Zone for Offensive Line, players and coaches. It’s pretty technical and, much like the Inside Zone, founded on a lot hard work and studying, and even more trial and error.
In this article we’ll look a bit more at the Outside Zone from a Coordinators perspective, the basics of running it, and some of the variations you can use to make a simple Outside Zone play, a staple part of your offense.
Before we get into the X and O’s, let’s have a look at the how the Running back fits into the scheme, and what this does to the defense.
For the purposes of these diagrams, I will use a spread, under centre look, and we will progress to different possibilities later on.
Aiming Point and Entry Point
If we remember from The Inside Zone – Article 4:
- The Aiming Point is the visual key the Running Back is aiming for.
- The Entry Point is the Gap you are e4xpecting to be open based on the defensive front.
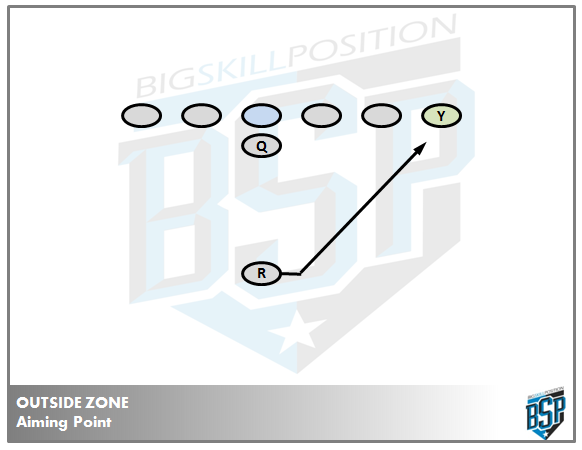
Aiming Point
Depending on who you listen to, the aiming point can be anywhere between the centreline of the tackle to a yard outside the TE. Ultimately, it’ll come down to your personnel and offensive style.
I like to have the Running Back (RB) have an aiming point of the centreline of the TE. (If there isn’t a TE in, imagine one!). If we are running from a shotgun formation, we will track this position rather than aim at it, but we will cover that later.
This allows the RB the best post-snap read of the play developing in front of him, before he makes his cut. We want to aim for the TE, get the defense flowing, and cut it back, more than likely behind the PSG or C. However, we all know this depends on a few things, mainly the defensive front, so let’s have a look at the entry points.
Entry Point
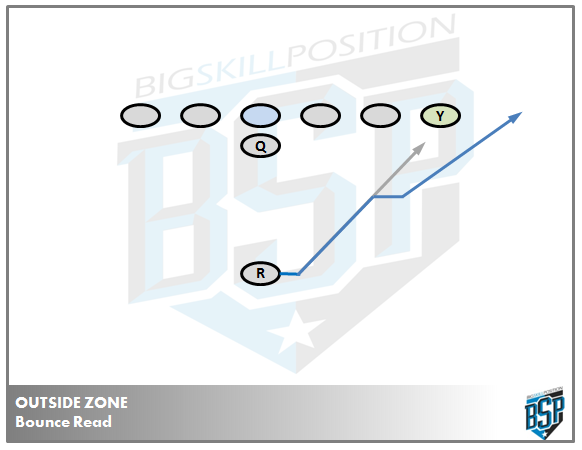
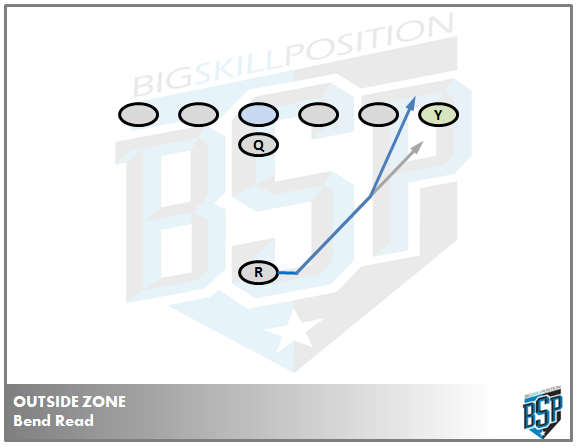
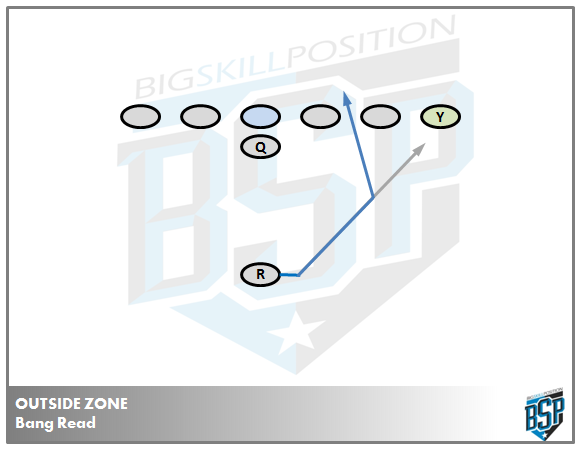
As with Inside Zone, we only have 3 entry points on any given Outside Zone play. This is to either Bang, Bend or Bounce.
In the Inside Zone, we are aiming for a hole, a specific gap in the line, and making our reads based on that.
In the Outside Zone we are simply running to an area, and making our reads as we go. In essence, we are running and blocking to influence the defense, and we read how they react. We don’t have a hole or gap we are aiming for, so that changes our reads.
Reads
Primarily speaking the Outside Zone has 2 RB reads the 1st down lineman and the 2nd down lineman. Each read keys a separate entry point that is easy to coach and easy for players to remember.
If #1 DL (EMLOS) is reached = BOUNCE
If #1 stretches, and #2 reached = BEND
If both #1 and #2 stretch = BANG.
BOUNCE IT – If we can get the outside, take it.
BEND IT – Hit it inside the #1 defender; look for OL block on LB for big yards.
BANG IT – Hit it inside the #2 defender, upfield cut, to gash the defense. Look for this to cut all the back to the other side of the field if the defense over-pursue
As with the Inside Zone articles, I have shown the RB’s aiming and entry points correctly, but haven’t shown the OL movement.
I have found that using BANG, BEND and BOUNCE terminology gives my running backs key phrases that can be quickly and easily coached, allowing us to practice faster. It provides a simple and effective framework that will allow you and your RB’s to best utilise their skills.
Outside Zone from Shotgun
The shotgun uses exactly the concept as Pistol or UC, however, needs some slight modifications to adjust for the RB’s offset position.
Footwork
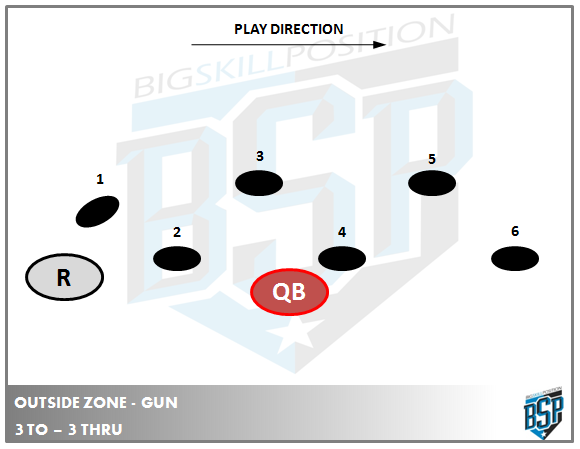
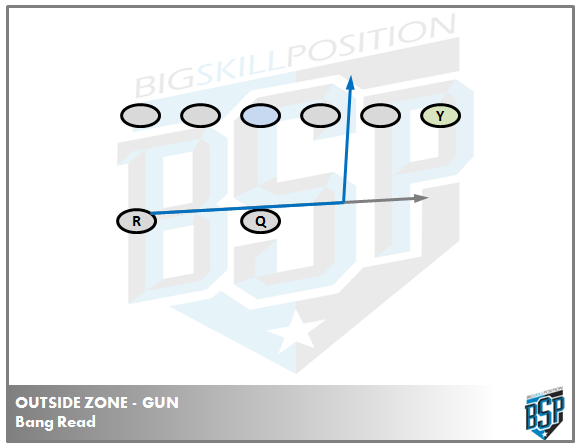
Our RB’s are taught a ‘3 steps to, 3 steps through’ technique from the shotgun, as shown below.
The 1st step is a cross over step, ensuring the outside foot is planted on 6th step when we should be making the upfield cut.
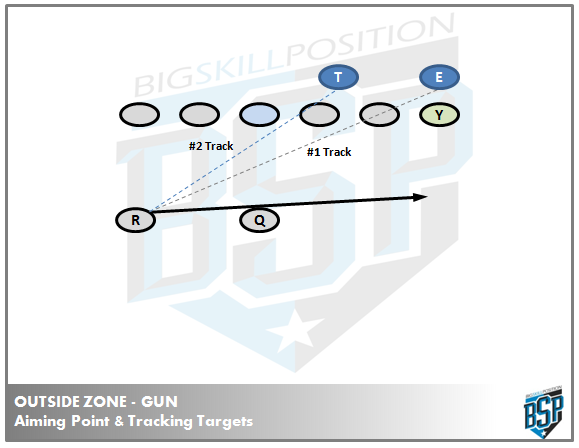
Aiming Point/Tracking Point
From the Shotgun, our Aiming Point is different; specifically, we look for a straight horizontal line, in front of the QB. You should still be at 4-4.5 yards depth when making your cut.
However, our reads must remain the same in order for the concept of the Outside Zone to work. We teach our RB’s to ‘track’ their reads feel their feet. We don’t want our RB’s counting steps, we need them focused on the reads, as shown below.
This allows us to implement the same rules for the RB as we do for UC or Pistol:
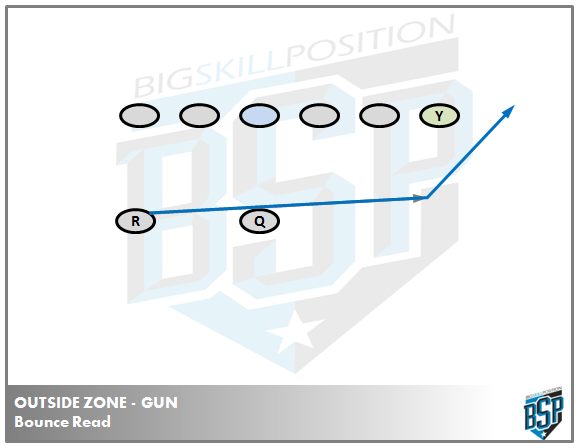
If #1 DL (EMLOS) is reached = BOUNCE
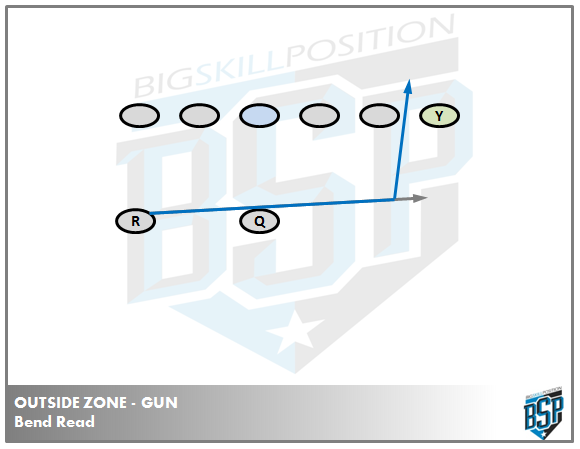
If #1 stretches, and #2 reached = BEND
If both #1 and #2 stretch = BANG.
BOUNCE IT – If the outside is available take it
BEND IT – When the #1 read plays outside, and #2 read gets reached, bend it inside #1.
BANG IT – When #1 and #2 play hard to the outside; the OL will wash them out, creating this running lane
Outside Zone from Shotgun has one major advantage, and that’s if the outside is there, your BOUNCE read is open, you hit that at full speed, there is almost no cut required, and that’s a powerful weapon if used correctly.
The obvious negative is the opposite of that, having to make the BANG read and cut, unless you have a Division 1 talent at RB, is pretty difficult to do and not lose momentum. That being said, it is still a very useable technique, and has served us well over the last few years.
The window dressing and various options when running OZ
At a coach/coordinator level, we must really start to think about the window dressing we use around these plays. Looking at formations, motions, reads, triple options are all things that you should look at when game planning for opponents.
From 4 WR packages, to empty, to 2 man backfield sets, to 3 man backfield sets, what can you utilise to give you an edge; and more importantly, how can you tie it all together so your players will understand quickly.
Let’s have a look at just a few of the options available to you:
Single Back Zone/Zone Read
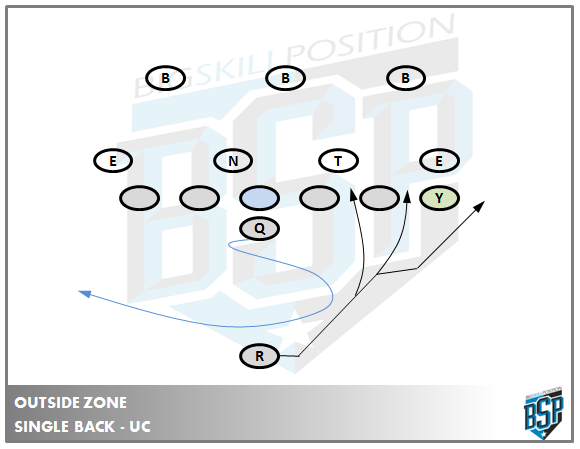
I’m a big traditional Outside Zone guy. I love running it over and over again, and watching the defense adjust to each one. Simple adjustments, like moving under centre on a 3rd & 1 play alert the defense to the possibility of a QB sneak, you can still have the Outside Zone called, and just run it from under centre, but you’ve changed how the defense reacts by a very subtle shift.
UC
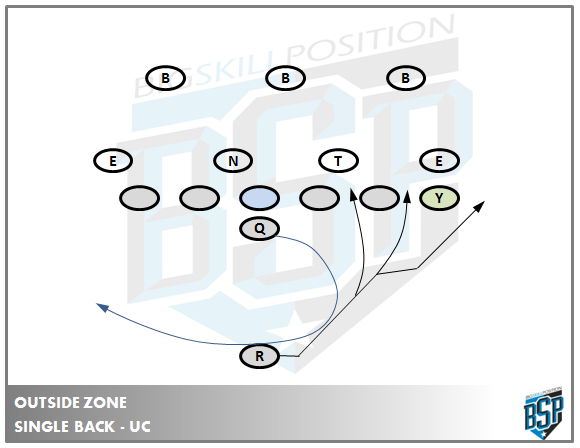
As you can see above, I like to reverse pivot the QB. This is actually a change to what we used last season. It takes a bit of repetition for the QB, but is easily implemented if enough time in practice is dedicated.
Last season we had the QB opening up playside (shown above), however this caused the QB to get to the handoff point to quick, and the RB having to bubble the aiming point, and take his eyes off his read. This year we went with the reverse pivot, and it’s tied everything up nicely. We also reverse pivot from pistol as shown below. This involves a slightly quicker motion for the QB to get the handoff point in time, but again, with enough practice time dedicated to it, it doesn’t become an issue.
Either way, the QB must execute the rollout, and feedback to you as a coach on what the DE is doing. As soon as the ball is handed off, he must snap his head round to locate the DE. If he sees the DE crashing in consistently, we will throw in a ‘QB keeper’ to gain some yardage, and force the DE to play his contain.
Read
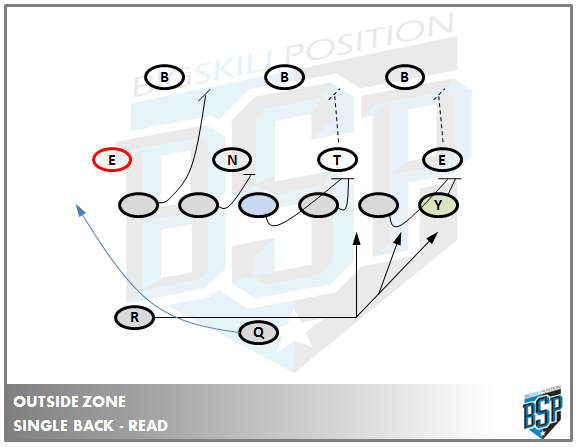
The Outside Zone read has been very popular for a number of years at the NCAA and high school level with QB’s getting more and more athletic and mobile. It is an easy to install play, that can really take advantage of defense that doesn’t keep contain or over pursues.
This play is simple to install because OL and RB are just running Outside Zone, and the QB has exactly the same rules here, as he does for Inside Zone Read:
If the DE goes upfield – GIVE the ball
If the DE crashes – KEEP the ball
But, obviously by aligning in the gun, we are showing the defense what way we are running the ball. Not the case, the Speed Option is another easy and simple play to add to your arsenal that can utilise Outside Zone blocking.
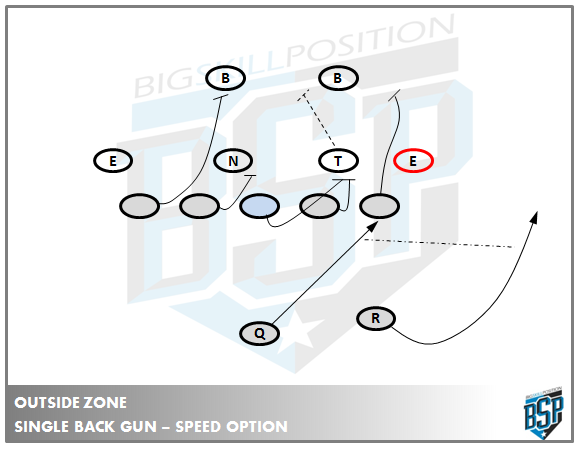
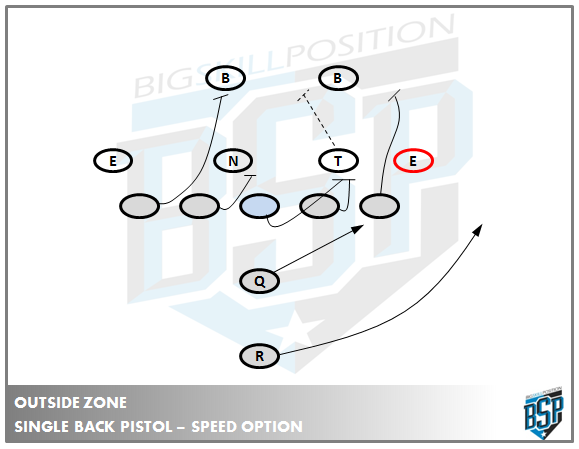
Speed Option
The Speed option is a simple an easy to install option play that will force the defense to play the run to both sides of the formation, both Strong and Weak.
The rules surrounding it are extremely simple.
OL = Outside Zone blocking. PS Tackle to ‘easy’ release to MDM on 2nd level.
‘Easy’ Release = We want an inside release, but if the EMLOS is playing Inside or slants that way, don’t fight him, take the easiest path to the 2nd level.
RB = Arc release on option path. Stay 6 yards wide and 1 yard behind QB.
QB = Aiming point is outside hip of EMLOS; force him to declare if he is covering you or the RB. Make the EMLOS wrong. If he stays wide – KEEP it; if he attacks you – PITCH it.
I like the Outside hip of the EMLOS, as for a couple of reasons:
- It gets width on the play, and really isolates the EMLOS
- It forces him to declare quickly if he is taking the QB or RB
If we aim for the inside hip, the DE has the capability of playing both QB and RB if he’s very good, and it close enough to the other DL that they may be able to make a play.
This play can also work well from the Pistol
2- Back Zone/Zone Read
In exactly the same way as the 2-Back Zone read adds a wrinkle to your Inside run game, the Outside Zone can be utilised in many different ways, to offer multiple looks and plays, whilst utilising similar concepts. Essentially what we are trying to do is expand what the opposition needs to defend, yet limit what we need to teach.
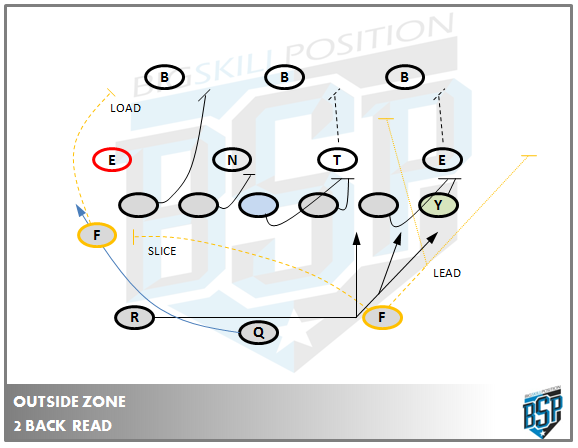
A 2 back Zone read game can be very explosive. Taking the standard zone read shown above, and ad in a FB/H-Back. We can make the play look very different.
You can call:
LEAD – FB leads the play, making the same BANG/BEND read as the RB
SLICE – FB blocks the Backside DE
LOAD – Tells the H-Back to leave the DE and block first force defender.
If the above is “Pro Rt. 28 Zone”, we can tag the fullback to give us very different looks, yet highly successful plays.
“Pro Rt. 28 Zone ‘Lead’” – we now have 7 v 6 blocking at the POA
“Pro Rt. 28 Zone ‘Slice’” – now we can still read what the DE does, but we have a body blocking him. The same read rules apply as before, but now if the DE goes upfield, the QB keeps it and runs off the FB block.
“Flanker Lt 28 Zone ‘Load’” – Now if the read dictates the QB keep the ball, we have an additional blocker in front, taking the first force defender.
The obvious benefits to this are that we can install multiple plays, very quickly, after teaching the concepts to the players.
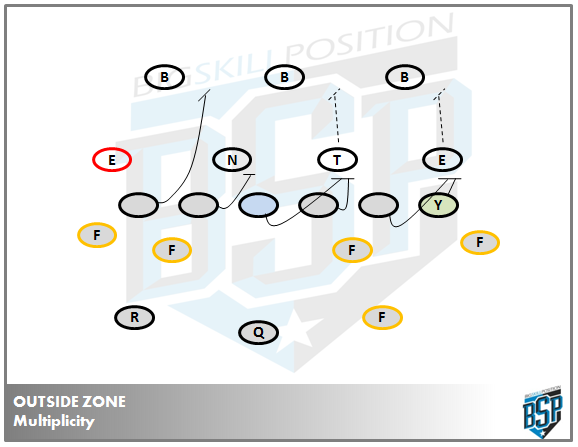
Above we can see some of the multiple position we could use a FB/H-Back. But there are countless more, and if you like to use motions in your offense, the opportunities are almost endless. You could Outside Zone 30 times a game and make it look different, every single time.
Speed Option
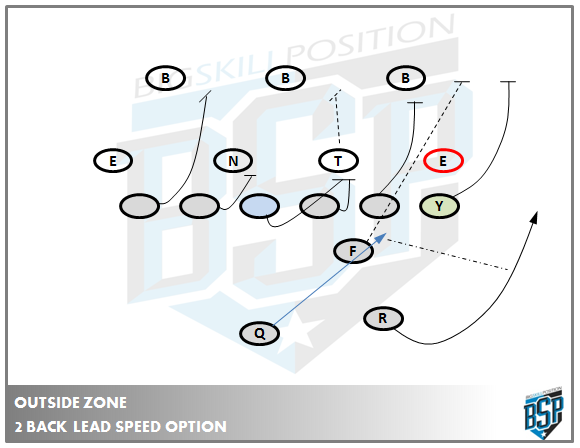
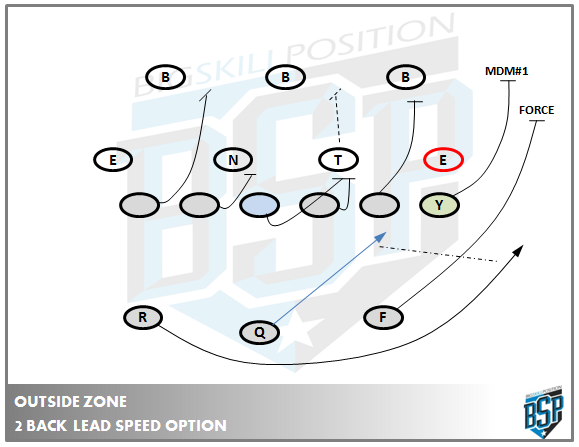
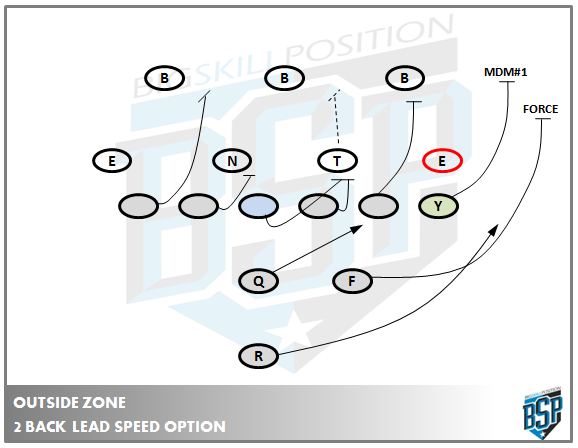
The two back version of speed option allows us to load the Point of attack. We are still executing the same play as above, but with the added bonus of a FB blocking the force defender, leaving the free releasing TE to look for the MDM, whether that is the OLB, or Force defender.
Here we are running it with the FB in an ‘On’ position, in between the Guard and Tackle and a yard off the line. His release will be inside the ‘Read’ man. In this scenario, he’ll be looking for the MDM, and the TE will be looking for the Force defender.
We can also run it from a typical Pro set as shown above, or from a Pistol King set as shown below.
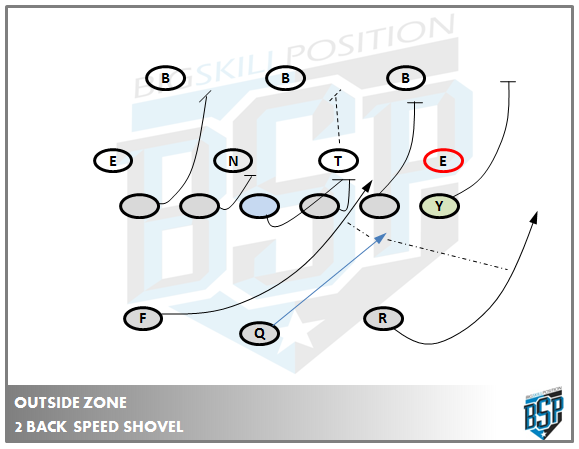
All we are doing is making very small modifications to our fundamental Outside Zone play, to allow us to be creative on offense, without overloading our players. Obviously, the two back Speed Option leads onto the Speed Shovel.
These are just some of the Options available to you, by building on the fundamental teachings of the Outside Zone.
Tagging the backside of your Outside Zone Scheme
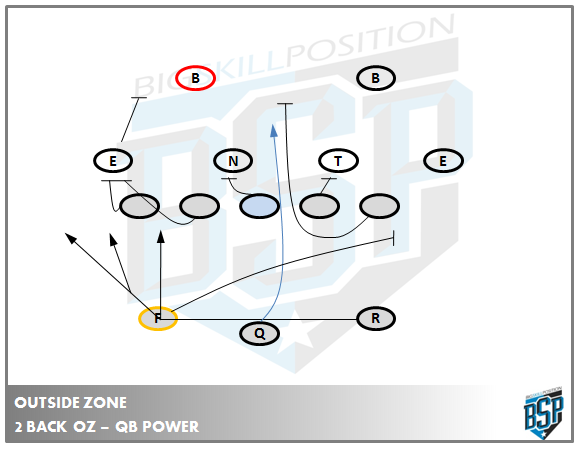
Utilising two backs, can also allow us to run different option plays, by tagging the backside of the Outside Zone.
What we can see above, is the playside of the Outside Zone, with the FB on the ‘Slice’ block, and the QB running in essence, a power play. The above play would be called “Red Lt OZ Tug, F Slice, Q Power”
The ‘TUG’ tag references the backside of the Zone concept, and instructs the Tackle Under Guard. The QB would simply read the PS LB to see if he flows with the OZ, or stays with the Power option, the Rule for the QB is:
PS LB stays = GIVE
PS LB flows = KEEP
Run/Pass Options
We covered a lot of ground on the Run/Pass option in Article 4, focusing on the Inside Zone. However the Outside Zone has a lot to bring to the table here as well.
The Inside Zone has to rely on bubble screens and short passes as your options, because lineman would be downfield if we threw anything deeper. Outside Zone doesn’t have that problem, as linemen are taking a much shallower attack angle, so will take them longer to cross the LOS and break through the buffer zone. This allows us more opportunities in the RPO game.
Slant/Flats
This is a pretty simple one to install and take advantage of the OLB. If he plays the run, we pull it and throw the slant, if he plays the pass, we run it.
Very simple reads, and a twist on the usual playside RPO that we see every day (Stick/Draw etc) by having the read on the backside.
SCAT Concept
This is a great play to throw in if you are already running this passing concept. Also known as a Snag concept, it’s similar to a Smash, but with an inside hitch from the #1 receiver and a corner over the top by #2. The corner throw here is open a lot more than you would think, as it puts a bind on the Safety, Corner and LB. What do the play, the run, or the pass!?
Getting the throw out quickly, as a RHTHYM throw (R4 terminology) is key, but can be an explosive play for your offense.
SMASH Concept
Finally, the Smash Concept, put the backside corner in a bind, and see what he’s playing. He can play the Dig route and the run, but he can’t also cover the Corner route over the top.
Critical to all of the above plays is the playside #1 receiver running a fade, and making the DB play him. We would also tag the backside tackle to stick on the BS DE, and provide some extra protection for the QB.
Summary
What I’ve tried to show above is not an exhaustive list by any stretch, but instead a series of plays and ideas that will open up your playbook, and allow you to incorporate the Outside Zone.
What if instead of running a Smash concept on the backside of Outside Zone, we ran a Fade/Seam? You can see the possibilities that are open to you!

